Generic Module
This document pertains to the Beta version of LabIMotion, formerly known as "Generic Module". Go to LabIMotion for the new LabIMotion docs.
Generic segments, elements and datasets
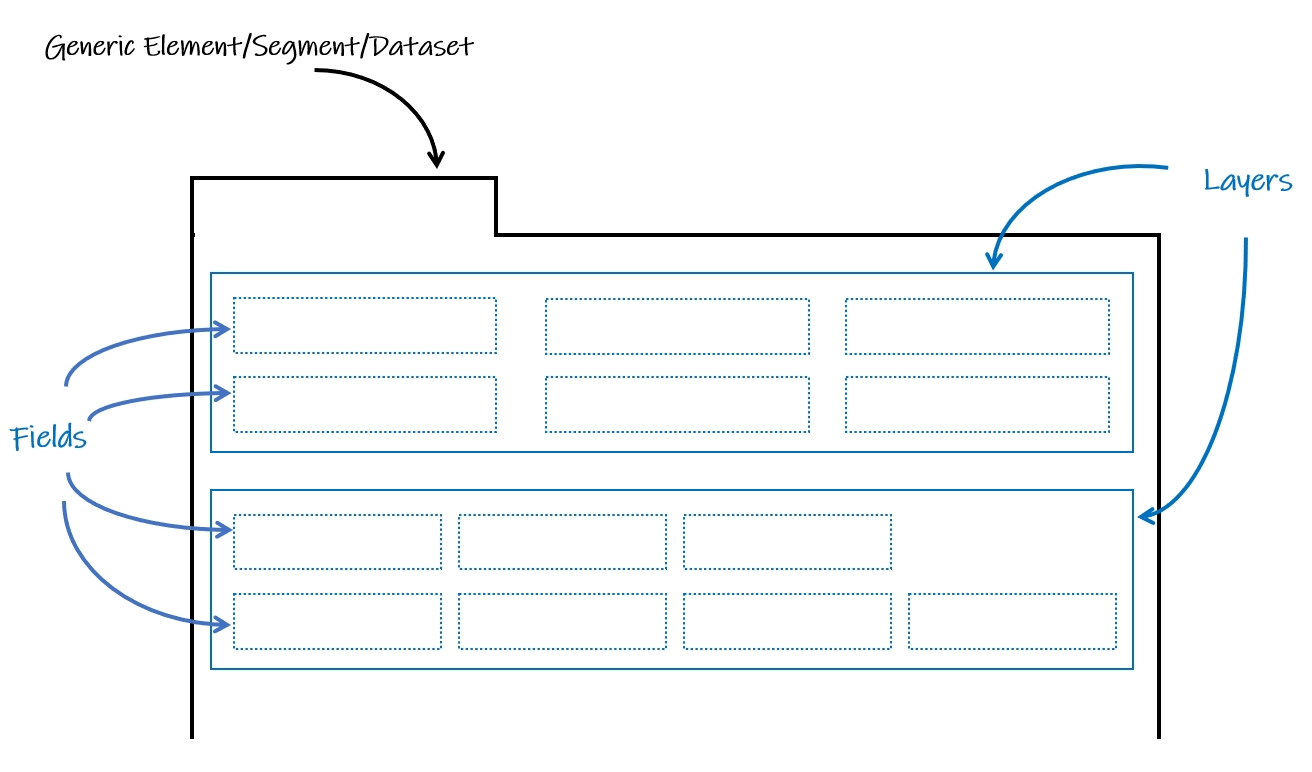
Generic elements and segments are organized by layers and fields. Each generic element or segment can contain multiple layers and each layer can consist of multiple fields.
Generic segments
A generic segment can be embedded in other elements, such as samples and reactions, as well as in generic elements.
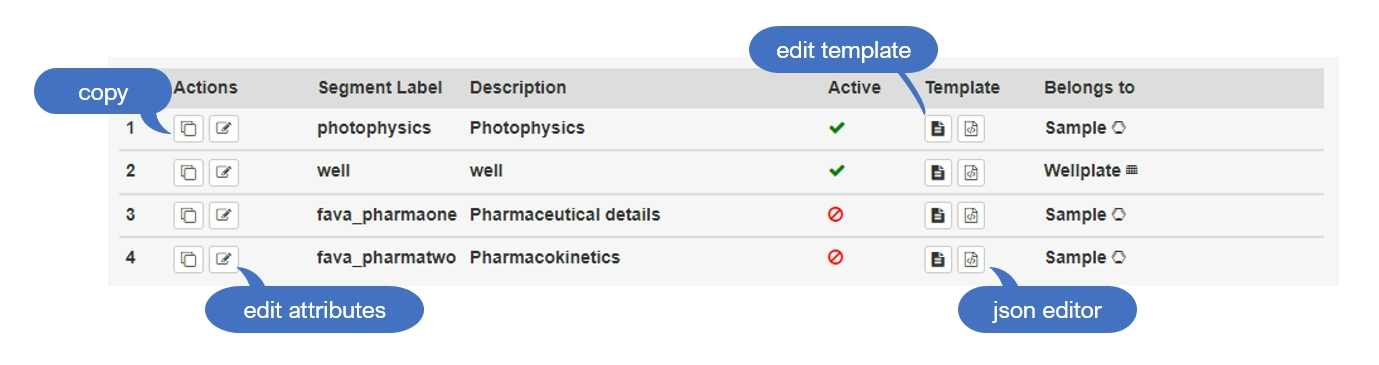
After clicking on the menu item Generic Segment, you find a button as well as a list of editable, existing segments.

The segments can be edited as follows.
You can create as many segments as possible for an element, e.g., sample, reaction, or any generic element. Once the segment is created, it can not be re-assigned to another element.
To create a segment, press the button , fill in the segment attributes, and press to save the data or the creation.
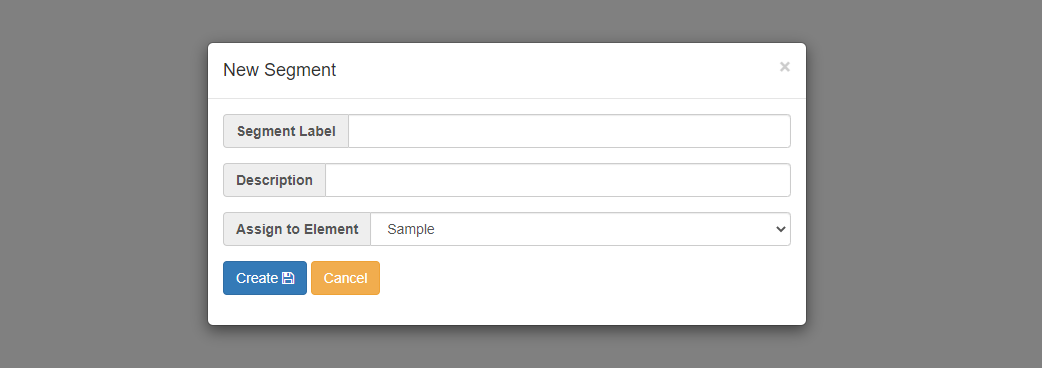
| attribute | required | explanation |
|---|---|---|
| Segment Label | Yes | The name displayed on the UI tab. |
| Description | No | Shown as a tooltip when the mouse hovers over the UI tab. |
| Assign to Element | Yes | Define which element this segment belongs to. |
Generic elements
By default Chemotion ELN contains five elements: samples, reactions, wellplates, screens, and research plans. Optionally, generic elements can be added by the administration.
To create a generic element, go to the page Generic Elements and press . This opens the window New Element to enter the following attributes:
| attribute | required | explanation |
|---|---|---|
| Klass | Yes | The name used to identify the element. |
| Prefix | Yes | A prefix for naming the generated objects that belong to the generic element, e.g., if the user name abbreviation is "user" and the Prefix is "t", then new "Mixture" will be called: "user-t1 New Mixture", "user-t2 New Mixture", etc.. |
| Label | Yes | The name displayed in the UI, e.g., the labels Sample, Reaction, Wellplate. |
| Icon | Yes | The icon to be displayed in the elements list and in the toolbar for creating new objects. Icons can be obtained from Font Awesome 4. |
| Description | No | Explanation of the intended functionality of the element. |
Once all the required attributes are provided, press to create the element, or cancel the process with .
After an element is created, it can either be added to the Chemotion ELN interfaces of all users, or made available to specific users. This option is also controlled by the administration. Users with access to an element have to add it manually to their accounts. To do so, they have to go to their Account & Profile, go to the Element Counter, and update the counter of the element with . Still, the element will be hidden by default, and it will not appear in the element bar unless the user manually adds it.
In the administration account, in the Generic Elements page, the element appears in the elements list (not to be confused with the elements list in the Chemotion ELN). The elements list includes all the elements generated by the admin’s account, along with their attributes and further functions. The elements are sorted alphabetically by status (active first), element label, and description.

| symbol | explanation |
|---|---|
| Copy the attributes of an element. | |
| Edit element attributes, delete the element or deactivate it. | |
| Edit the element template. | |
| Edit the element template in json format. |
Editing the element's template allows adding new layers and lists to the Properties tab of the element. More on that in the next chapter.
Generic datasets
Layers
Layers are the fundamental building blocks that contain the content of generic elements/segments/datasets. They can be used to group related fields with a custom layout and appearance. Layers can be added to elements and segments by clicking on edit element/segment template in the elements/segments list, and then clicking .
The following attributes can be configured on a layer:
| attribute | required | explanation |
|---|---|---|
| Name | yes | The name used to identify the layer, must be unique in the template. |
| Display name | No | The name displayed in the details modal. |
| Columns per row | Yes | The maximum number of fields to be aligned in one row (default is 1). |
| Sequential position | No | A number to sort the layers, if left empty, they are ordered by the order of creation. |
| Restriction | No | A maximum for certain fields. |
| Header color | No | A color for the Display name. |
| Style Option | Yes | Style of the Display name, "bold" is the default. |
After a new layer is created, it appears in the layers list, where its Name, Display name, the number of columns per row, and the number of fields can be found. Layers can be edited with the following functions:
| symbol | explanation |
|---|---|
| Edit the layer's attributes. | |
| Delete the layer. | |
| Add new fields. | |
| Add dummy fields. |
Whenever a new layer is added, or an existing one is edited, changes need to be saved with
. Once saved, a user with access to the element or segment will be able to see the new layer upon reloading the page in their account, and pressing the button . Admins can add fields to a layer, as discussed below.
Fields
Fields provide a wide variety of input, display, and drag-and-drop functions. They can be customized using the following attributes.
| attribute | required | explanation |
|---|---|---|
| Field Name | Yes | The name given by the admin when first creating the field. It is the name used to identify the field in the system. It must be unique in the template. |
| Display Name | No | The name displayed in the details modal. It has the same value as the Field Name by default, but the admin can modify it or delete it to create a field without a displayed name. |
| Hover Info | No | An explanatory text to be shown when the mouse hovers over the Display Name. |
| Type | Yes | The type of the field (more details about it in the next paragraph). Its value is "text" by default, but can be modified by the admin. |
Field types
| type | availability | dependencies | explanation |
|---|---|---|---|
| checkbox | v0.9.0+ | --- | A small square box to let the user make a binary choice. |
| drag molecule | v0.9.0+ | --- | An icon with drag-and-drop function to let user add a molecule into a generic element/segment by drag-and-drop; it will display the molecule image after being added. |
| drag sample | v0.9.0+ (generic element only) | --- | An icon with drag-and-drop function to let the user add a sample into a generic element by drag-and-drop; it will display the sample image after adding. It also enables using the exact drag-and-dropped sample, a split of it, or a copy. |
| formula field | v0.9.0+ | --- | A calculation field; as an admin, define a formula using other fields, and the system does the calculation automatically. |
| input group | v0.9.0+ | --- | A group of fields; the fields can be 'label', 'text', or 'number'. 'label' is used for display only, and the user can't modify its default value, while 'text' and 'integer' are used as an input field, but still the admins can give them a default value. |
| integer | v0.9.0+ | --- | An input field for integer entries. |
| select | v0.9.0+ | --- | A dropdown list to let user select an item. |
| system-defined | v0.9.0+ | --- | An interconvertible unit field; with a numerical input field and a button for unit conversion (details). |
| text | v0.9.0+ | --- | An input field for a single editable line of text. |
| text area | v0.9.0+ | --- | An input field with adaptable size for multi-line text. |
| text formula | v0.9.0+ | --- | A (display only) field to let users combine other fields or descriptions. |
Field-type: System-defined
The field type System-defined allows to add values with a unit. Units are assigned to certain standards in the research field but should meet common conventions and definitions. Depending on the unit, different conversions are available.
| unit name | unit default | interconversion 1 | interconversion 2 | interconversion 3 | interconversion 4 |
|---|---|---|---|---|---|
| Acceleration | mm/s² | --- | --- | --- | --- |
| Agitation | rpm | --- | --- | --- | --- |
| Amount enzyme as nmol/min | U | mU | --- | --- | --- |
| Chem. concentration (Molarity) | mol/L (M) | mmol/L (mM) | nmol/L (nM) | pmol/L (pM) | --- |
| Chem. distances | Å | --- | --- | --- | --- |
| Concentration | ng/L | mg/L | g/L | --- | --- |
| Conductivity | S/m | --- | --- | --- | --- |
| Degree | ° | --- | --- | --- | --- |
| Duration | day(s) | hour(s) | min(s) | sec(s) | --- |
| Elastic modulus | MPa | kPa | Pa | --- | --- |
| Enzyme activity | U/L | U/mL | --- | --- | --- |
| Frequency | Hz | kHz | --- | --- | --- |
| Heating rate | K/min | --- | --- | --- | --- |
| Length | pm | nm | mm | cm | m |
| Mass | g | mg | µg | --- | --- |
| Mass of molecule | D | kD | --- | --- | --- |
| Molecular weight | g/mol | --- | --- | --- | --- |
| Percentage | % | --- | --- | --- | --- |
| Pressure | atm | Pa | Torr | --- | --- |
| Reaction rate | mol/Lmin | mol/Ls | --- | --- | --- |
| Speed | cm/s | mm/s | cm/h | mm/h | --- |
| Surface | A² | mm² | cm² | --- | --- |
| Temperature | °C | °F | K | --- | --- |
| Turnover number | 1/s | --- | --- | --- | --- |
| Viscosity | mL/g | --- | --- | --- | --- |
| Voltage | mV | V | --- | --- | --- |
| Volumes | l | ml | µl | nl | --- |